The New Specification Assistant
You used to write specifications by staring at an empty file and trying to remember every section that belonged there, every edge case you'd regret forgetting, every sibling spec you might be about to duplicate. The New Spec Assistant takes a single sentence of intent and gives you back a structured, context-aware first draft — then helps you make it correct and complete before you commit a word to disk.
This page is a hands-on walkthrough. Open the assistant in VS Code and follow the numbered steps; nothing here is persisted until you explicitly press Create, so you can explore freely.
This guide covers the AI-assisted (From Idea) path and the happy path through it. The template-only path and error recovery are documented separately.
Watch the Walkthrough
Prefer to watch before you read? This tutorial walks through the New Spec Assistant end to end — the same flow the numbered steps below describe.
Before You Start
The assistant always knows what you're creating and where it goes — because you launch it from the spec tree, not from a blank menu.
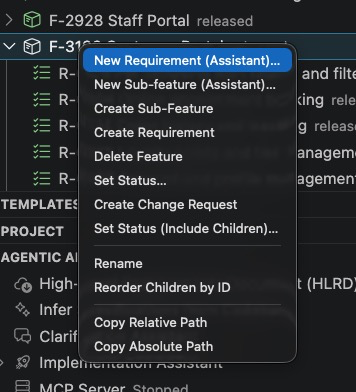
- In the SPECLAN spec tree, right-click a feature.
- Choose New Sub-feature (Assistant) or New Requirement (Assistant). To start a top-level feature, use the tree's New Feature action.
- The assistant opens already knowing the artifact type and the parent it belongs under. You never re-enter what the tree already knows.
The panel opens with two tabs above a shared header:
- From Idea — the AI path. Available whenever your AI provider is configured and reachable.
- From Template — a structured scaffold from a template and a title, no AI required. Always available.
The shared header (title field, artifact-type chip, parent-context pill) sits above both tabs and is preserved if you switch between them. This walkthrough stays on From Idea.
Phase 1 — Idea Entry
This is where the journey begins. The footer at the bottom of the panel is phase-aware: it always shows you the one button that moves you forward, so you never hunt for the right affordance.
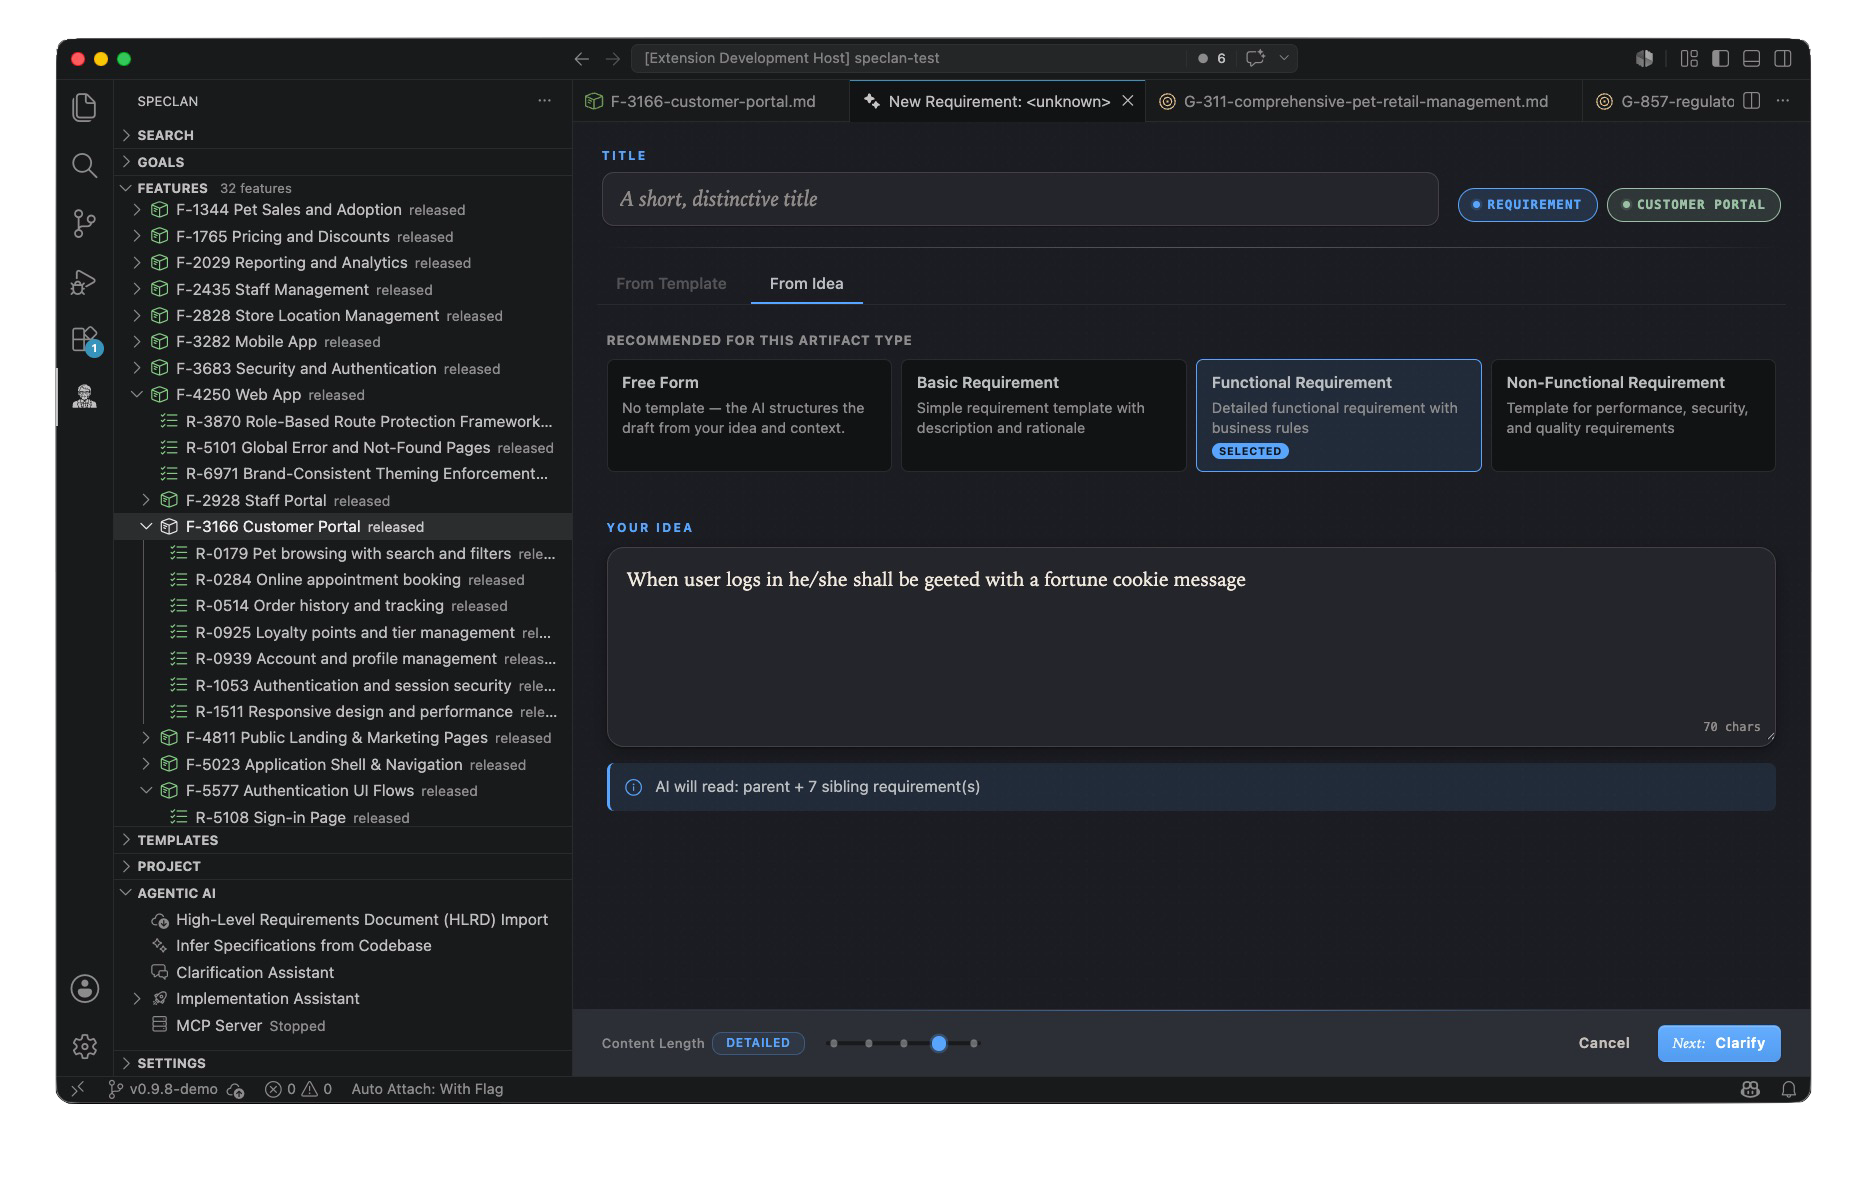
- Make sure the From Idea tab is selected.
- (Optional) Type a title in the shared header. If you leave it blank, the AI proposes one and adopts it into the header so you can see what's about to be created — you can always edit it before Create.
- (Optional) Pick a template from the recommended cards. On the AI path a template is just a hint to the AI, not a hard structure. While the draft is being generated these cards are locked, so you can't change the structure out from under an in-flight draft.
- Type your idea into the large text box — one sentence is enough. The context pill tells you exactly what surrounding specification the AI will read first (for example, "AI will read: parent + 7 sibling requirement(s)"), so the draft is connected to your project rather than written in a vacuum.
- Look at the footer's primary button on the right:
- If you left the title blank, it reads "Next: Clarify".
- If you typed a title, it reads "Next: Generate Draft".
- Either label runs the same step. The button is disabled until the idea box has text. Cancel sits to its left in every phase as the universal escape hatch.
- Click the primary button.
The assistant now decides whether it needs to ask you anything before drafting. If your idea is already clear in the available context, it tells you so explicitly ("Idea is clear — drafting…") and jumps straight to the draft. Otherwise, you enter the clarification phase.
Phase 2 — Clarification Q&A
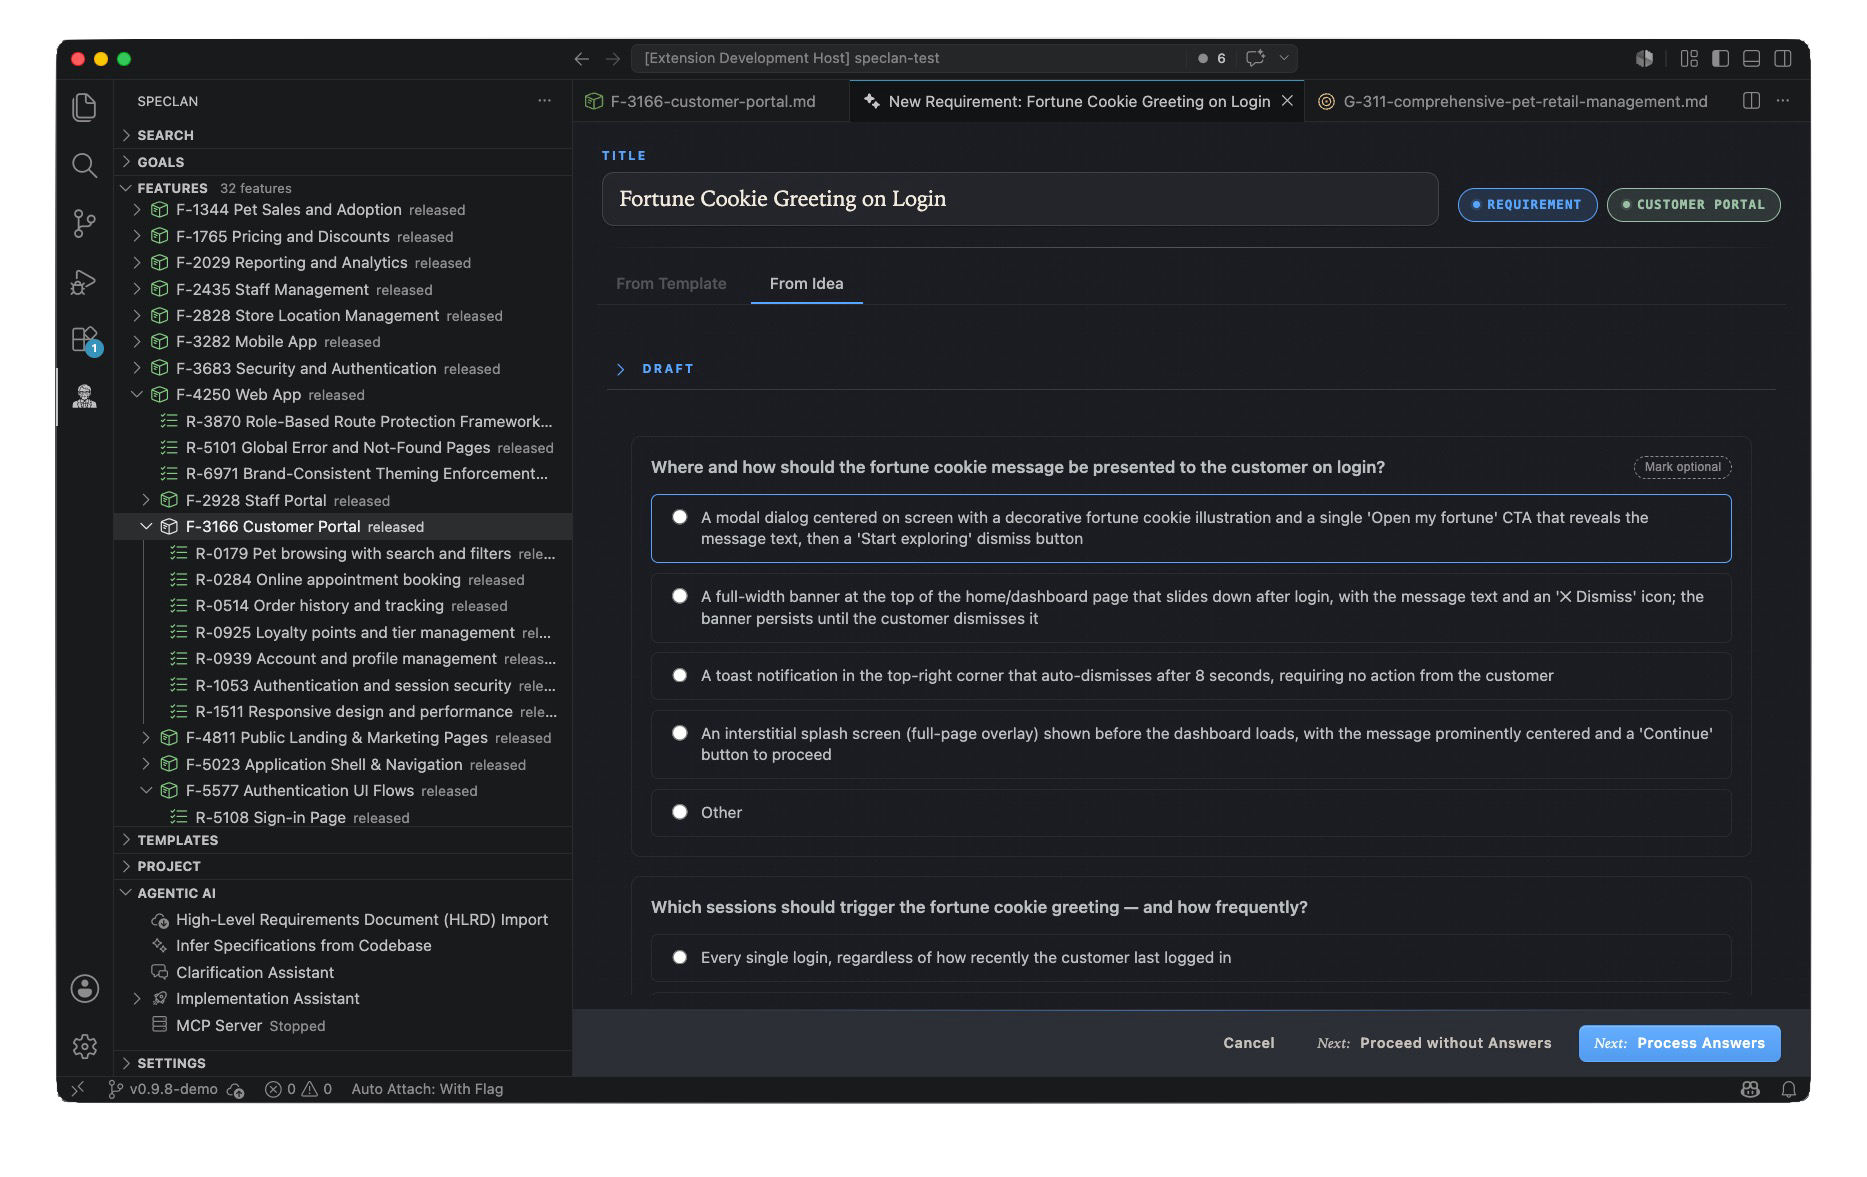
When the idea leaves room for interpretation, the assistant presents up to three clarification questions on a single page (a form, not a multi-step wizard). This step is always optional — you are never blocked.
Each question comes in the type that best fits the decision being asked:
- Multiple choice — checkboxes, used when several answers can apply at once. Always includes an Other free-text option and a None of these apply option (with a "why none?" box). Picking None clears the other selections.
- Decision (single choice) — radio buttons, used when you should pick one primary direction. Always includes an Other free-text option.
- Free text — a plain text box, used when the assistant needs your judgment in your own words.
Work through the form:
- Answer the questions that matter to you. Leave any question blank to skip it — unanswered and answered questions are visually distinct, so you always know what you've addressed.
- (Optional) Use each question's importance control to mark how much that ambiguity matters. You rate importance independently of whether you answer — a way to tell the assistant which gaps are most worth resolving even if you can't answer them yet.
- Choose a footer action:
- "Next: Process Answers" (primary, right) — apply your answers and refine the draft.
- "Next: Proceed without Answers" (secondary) — skip the whole form and let the AI draft with reasonable assumptions, made visible in the result.
- Cancel — the universal escape hatch (closes the assistant).
While the AI is generating questions or working your answers back in, the relevant footer button shows an in-button spinner and stays disabled — that button is the single source of truth for progress. You won't see a separate banner, and the panel won't jump ahead while the AI is still working.
When the refinement completes, the assistant doesn't bolt a Q&A list onto the bottom of the spec — it rewrites the draft body so your answers are woven in, and returns you to the Draft Review page with the tighter version ready.
Phase 3 — Draft Review
You now have a real specification draft — scoped sections, acceptance criteria, and validated relative links to related specs already in your project. Review it in the panel.
The footer in this phase offers:
- Create (primary, right) — write the draft to disk. It lands in
draftstatus, the very start of the normal review lifecycle. The assistant then closes itself and confirms the new artifact's identifier. - Cancel — discard and close.
- Clarify and Brainstorm (centre) — the two refinement tools, if they are available (see the gating rule below).
You can press Create here and be done. Or you can sharpen the draft first with one of the two tools.
The Gating Rule
Clarify and Brainstorm appear in Draft Review only after at least one clarification cycle has completed against the current draft. They are deliberately hidden:
- during idea entry (there's no draft yet),
- during the Q&A phase (you're mid-iteration),
- on a first-pass draft where the AI never needed to ask you anything ("idea was already clear"),
- on a draft where you skipped clarification while must-answer questions were still unanswered.
This keeps the iteration tools off drafts they can't meaningfully act on. Once you've been through one clarification round, both tools are available for as many follow-on rounds as you like.
The Clarify Tool — Catch the Ambiguity
A first draft is confident, and that's the problem: the gaps hide as assumptions nobody questioned. Clarify makes them speak up.
- In Draft Review, click Clarify in the footer's centre.
- The assistant opens a dedicated Clarify page and re-reads your draft like a skeptical reviewer, looking for ambiguous wording, underspecified behavior, missing scope boundaries, and unstated decisions.
- It presents a fresh set of questions — same three types and the same skip/importance behavior as Phase 2. Answer what matters, skip the rest, rate importance as you like.
- Choose a footer action:
- "Next: Process Answers" — apply your answers; the AI runs a refinement pass and works them back into the draft body.
- "Next: Proceed without Answers" — proceed without answering.
- "Cancel Clarification" — abandon just this clarification round and return to the draft preview exactly as it was. This does not close the assistant — you're back in Draft Review, free to Create, Clarify again, or Brainstorm.
- When the refinement finishes, you return to Draft Review with the revised draft already in place.
Run Clarify as many times as the draft needs. Each round makes it more precise.
The Brainstorm Tool — Find the Angles You Didn't Think Of
Clarify makes a draft correct. Brainstorm makes it complete — it surfaces the directions, edge cases, and inconsistencies a good reviewer would have raised.
- In Draft Review, click Brainstorm in the footer's centre.
- The assistant generates a set of idea cards from your draft and its surrounding context — scope options, related requirements, edge cases, and places the draft quietly contradicts the specs around it.
- Review each card and react to it:
- Accept an idea to keep it — accepted ideas are the ones that will be worked into the draft.
- Reject an idea to discard it — it is no longer treated as preferred.
- Click the same button again to toggle a reaction back to neutral. Only the ideas you Accept are incorporated; rejected and untouched ideas are not.
- (Optional) While ideas are still generating, the footer shows "Cancel Brainstorm" — it cancels only this brainstorm round and returns you to the draft, not the whole assistant.
- When you've made your choices, use the footer at the bottom of the panel:
- Apply N accepted idea(s) (primary) — run a refinement pass that weaves your accepted ideas into the draft body. Disabled until at least one idea is accepted.
- Done (no changes) — leave brainstorming without changing the draft.
- You return to Draft Review with the updated draft. Spec links inside an idea are clickable — they open the referenced spec in a side-by-side preview so you can check context without leaving the flow.
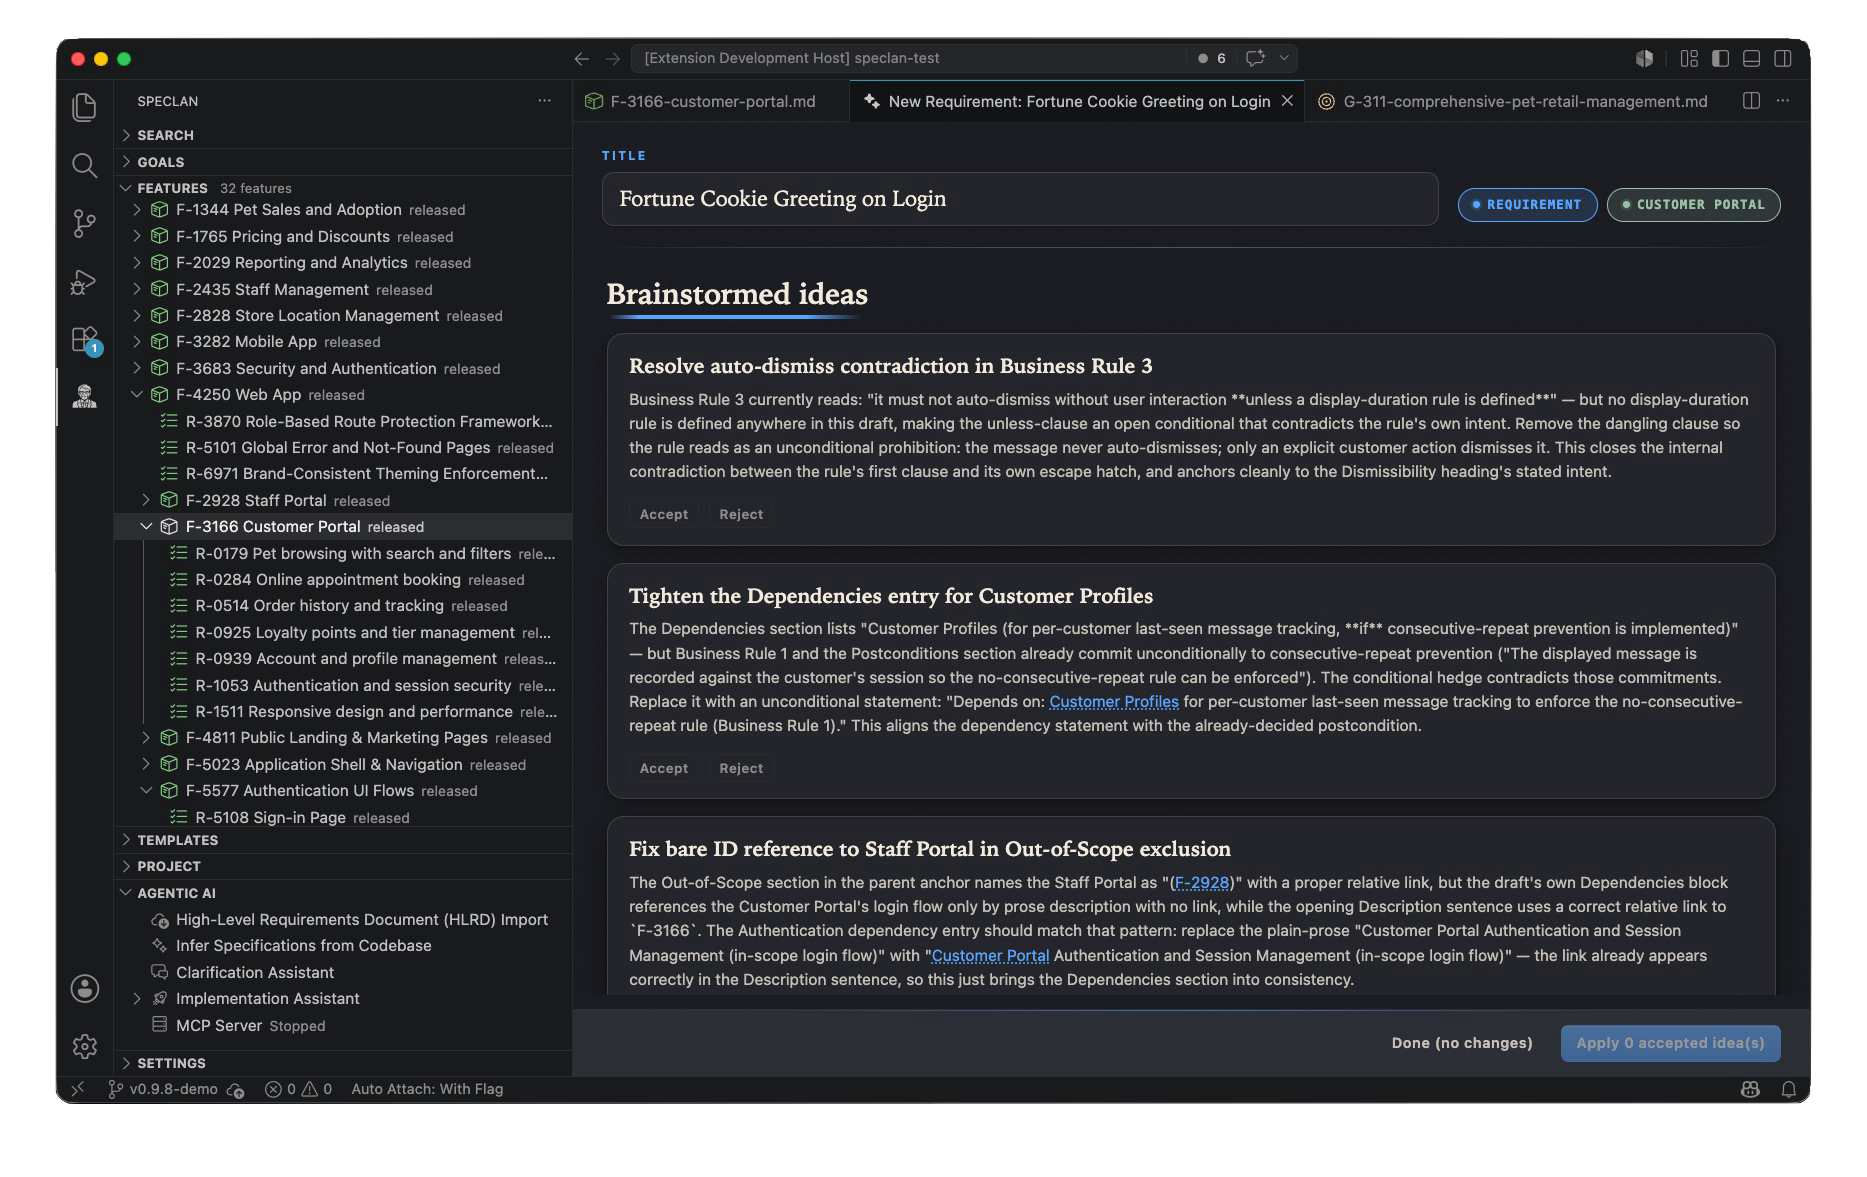
What's notable is what the AI raises: not padding, but real catches — a business-rule contradiction, a dependency pointing at a bare ID instead of a link, an ambiguously named out-of-scope exclusion. You are the filter. Brainstorm widens the option space; it never widens your scope without your consent.
You Stay in Control the Whole Way
At no point does the assistant finalize a spec for you:
- Clarification questions are optional — answer, skip individually, or proceed without any.
- Clarify asks; you answer or skip. Brainstorm offers; you accept or reject.
- The draft lives in memory until you press Create. Nothing touches disk before that.
- A created spec lands in
draftstatus — the start of the review lifecycle, not the end. Owners and stakeholders review it exactly as they always have. - Cancel (and the scoped Cancel Clarification / Cancel Brainstorm) is always one click away.
The assistant is a faster path to a better first draft. It is not a shortcut around the judgment that makes a specification worth writing down.
Quick Reference — Footer by Phase
| Phase | You are here when… | Footer actions |
|---|---|---|
| Idea entry | No draft yet, no questions pending | Cancel · Next: Clarify / Next: Generate Draft |
| Clarification Q&A | The AI asked questions, or a refine round-trip is in flight | Cancel · Next: Proceed without Answers · Next: Process Answers |
| Draft review | A draft exists, no questions pending | Cancel · Create · (centre, when gated-in) Clarify · Brainstorm |
| Clarify page | Inside a follow-on Clarify round | Cancel Clarification · Next: Proceed without Answers · Next: Process Answers |
| Brainstorm page | Inside a follow-on Brainstorm round | (generating) Cancel Brainstorm — (ideas shown) Done (no changes) · Apply N accepted idea(s) |
Your specification was always your prompt. Now SPECLAN helps you write it.